ShareKit è una libreria open source che consente di aggiungere velocemente le funzioni di “condivisione” nella propria applicazione per iOS. Il progetto supporta la condivisione di link, immagini, testo, e files sui principali social network quali Facebook, Twitter, Delicious, Read it Later e molti altri.
ShareKit panoramica
Per una veloce panoramica sulle capacità che ShareKit può introdurre nel progetto vi mostro un video preso dal sito web ufficiale:
Il progetto ShareKit supporta i seguenti formati:
- Delicious
- Google Reader
- Instapaper
- Pinboard
- Read It Later
- Tumblr
Istruzioni per l’integrazione
L’integrazione di ShareKit è ben documentata sul sito web ufficiale in 5 passaggi davvero semplici. Comunque siccome, ad oggi, non è presente una guida per Xcode 4 andiamo a vedere i vari passaggi asseme.
1-Download
Puoi scaricare ShareKit direttamente dal sito del progetto (ver 0.2.1)
2-Aggiungere ShareKit al tuo progetto in Xcode 4
Dopo aver aperto il download di ShareKit, espandete la clartella “classes” e troverete una cartella chiamata “ShareKit”.
Trascinate questa cartella nel vostro progetto. Potete trascinarla in qualsiasi posizione, ma io vi consiglio di creare un sottogruppo chiamato ShareKit sotto il progetto principale.
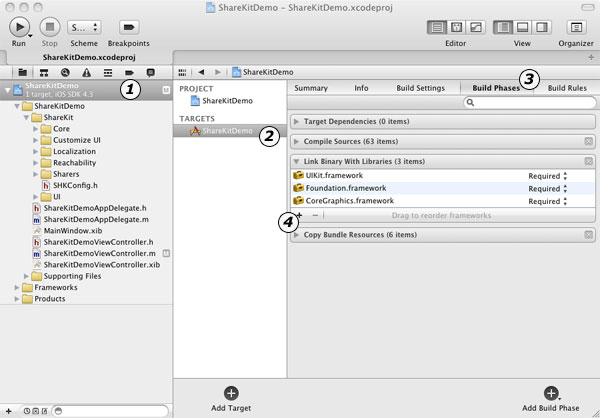
3-Aggiungere i Frameworks necessari
Selezionate il nome del vostro progetto dal pannello di navigazione a sinistra, poi evidenziate il target principale, selezionate il tab “Buil Phases”, ed espandete la sezione “Link Binary with Libraries”.
adesso cliccate sul simbolo “+” per aprire una finestra di dialogo con tutti i frameworks disponibili. Per far funzionare ShareKit dovreste aggiungere i seguenti frameworks al progetto:
- SystemConfiguration.framework
- Security.framework
- MessageUI.framework
4-Aggiungere le chiavi API dei servizi web
Molti dei metodi disponibili in ShareKit richiedono una chiave API per funzionare, questa chiave servirà ad identificare la vostra applicazione dai servizi di terze parti.
Per ottenere queste chiavi bisogna bisogna registrarsi nella categoria “developer” di ogni servizio, ecco alcuni link:
*Nota che se vuoi avere la possibilità di condividere contenuti via Twitter, hai bisogno di registrare anche il servizio “Bit.ly”, poi ShareKit si occuperà di accorciare tutti i link postati.
Dopo aver ottenuto tutte le chiavi API necessarie all’applicazione, aprite il file SHKConfig.h in Xcode (si trova nel gruppo ShareKit). Se leggete i commenti in questo file sarete in grado di individuare tutte le sezioni dove inserire le vostre API personali.
Ad esempio ecco come configurare Twitter usando OAuth:
#define SHKTwitterConsumerKey @"wUf7eXia2pMl1QUvkaL4"
#define SHKTwitterSecret @"kHudJVKjM6m5DRKYCutSxkBHHUwiTrRNMvGNhL1LMk3G"
#define SHKTwitterCallbackUrl @"http://iprog.it"
#define SHKBitLyLogin @"username"
#define SHKBitLyKey @"kHudJVKjM6m5DRKYCutSxkBHHUwiTrRNMvGNhL1LMk3G"
5-Importare l’header di ShareKit e lanciarlo
Prima di poter usare ShareKit nelle proprie classi, hai bisogno di importare l’header di Sharekit quindi:
// Create the item to share (in this example, a url)
NSURL *url = [NSURL URLWithString:@"http://getsharekit.com"];
SHKItem *item = [SHKItem URL:url title:@"ShareKit is Awesome!"];
// Get the ShareKit action sheet
SHKActionSheet *actionSheet = [SHKActionSheet actionSheetForItem:item];
// Display the action sheet
[actionSheet showFromToolbar:navigationController.toolbar];
L’esempio può essere usato quando si lancia ShareKit da una pulsante in una UINavigationController ma la logica generale può essere personalizzata e piazzata dovunque, ad esempio può essere eseguita in un metodo i UIButton oppure nel viewDidLoad:.
Frammenti di codice
Dopo aver integrato con successo ShareKit nell’applicazione sono felice di darvi delle porzioni di codice per poter condividere praticamente di tutto sui social network dalla vostra applicazione iPhone o iPad.
Condividi un Link
// Create an NSURL. This could come from anywhere in your app.
    NSURL *url = [NSURL URLWithString:@"https://www.iprog.it"];
// Wrap the URL within the SHKItem Class SHKItem *item = [SHKItem URL:url title:@”iProg.es!”];
// Create a ShareKit ActionSheet and Assign the Sheet an SHKItem SHKActionSheet *actionSheet = [SHKActionSheet actionSheetForItem:item];
// Display the ActionSheet in the current UIView [actionSheet showInView:self.view];
Condividi un testo
// Create an NSString. This could be taken from a UITextField or anywhere else.
    NSString *textToShare = @"Impara a programmare su iprog.it";
// Wrap the NSString within the SHKItem Class
SHKItem *item = [SHKItem text:textToShare];
// Create a ShareKit ActionSheet and Assign the Sheet an SHKItem SHKActionSheet *actionSheet = [SHKActionSheet actionSheetForItem:item];
// Display the ActionSheet in the current UIView [actionSheet showInView:self.view];
Condividi una foto
// Create a UIImage.
    UIImage *image = [UIImage imageNamed:@"ShareKit.jpg"];
// Wrap the UIImage within the SHKItem class
SHKItem *item = [SHKItem image:image title:@”This image was sent with ShareKit!”];
// Create a ShareKit ActionSheet and Assign the Sheet an SHKItem SHKActionSheet *actionSheet = [SHKActionSheet actionSheetForItem:item];
// Display the ActionSheet in the current UIView [actionSheet showInView:self.view];
Condividi un File
// Get the path to the file we want to share. This example resuses the
// the JPG file from above, but it could be anything.
    NSString *path = [[NSBundle mainBundle] pathForResource:@"ShareKit" ofType:@"jpg"];
// Create an NSData object from the contents of a file.
NSData *file = [NSData dataWithContentsOfFile:path];
// Wrap the NSData object within an SHKItem SHKItem *item = [SHKItem file:file filename:@”ShareKit.jpg” mimeType:@”application/image” title:@”A ShareKit Picture”];
// Create a ShareKit ActionSheet and Assign the Sheet an SHKItem SHKActionSheet *actionSheet = [SHKActionSheet actionSheetForItem:item];
// Display the ActionSheet in the current UIView [actionSheet showInView:self.view];
E voi cosa usate nei vostri progetti per la condivisione sui social network?

