Recently, I came across a blog by Andy Davies that detailed how to capture and decrypt HTTPS traffic from iOS apps using Frida. Unfortunately, the script he shared didn’t work for me, likely because my device was unable to load the libboringssl.dylib library into memory in time. As a result, I decided to rewrite and adapt the script to better suit my needs, incorporating several improvements along the way.
If you’re interested in the theoretical aspects, I highly recommend checking out Andy Davies’ blog; it’s truly fascinating. In this post, I’ll focus more on showcasing the script I modified. Additionally, I encountered some issues with rvictl during testing, but fortunately, I found a Python script that works perfectly. You can check it out here: rvictl.py
Below, you’ll find the updated Frida code.
function offset() {
    var processInfo = ObjC.classes.NSProcessInfo.processInfo();
    var versionString = processInfo.operatingSystemVersionString().toString();
    // E.g. "Version 13.5 (Build 17F75)"
    var ver = versionString.split(' ');
    var version = ver[1];
    //tested
    if (version.startsWith("14")) {
       return 0x2B8;
    }
    //Not tested
    else if (version.startsWith("15")){
        return 0x2f8;
    }
    //Not tested
    else if (version.startsWith("16")){
        return 0x300;
    }
    //Not tested
    else if (version.startsWith("17")){
        return 0x308;
    }
    else {
        console.log("Unknown iOS version: " + version);
    }
}

var key_log_callback = new NativeCallback(key_logger, 'void', ['pointer', 'pointer']);
function key_logger(ssl, line) {
     console.log(new NativePointer(line).readCString());
 }


Interceptor.attach(Module.findExportByName(null, 'dlopen'), {

    onEnter: function (args) {
        var libNamePointer = args[0];
        if (libNamePointer.isNull()) {
            console.log('Library name pointer is null.');
            return;
        }

        var libName = Memory.readUtf8String(libNamePointer);
        if (libName === null) {
            console.log('Failed to read library name.');
            return;
        }

        if (libName.indexOf('libboringssl.dylib') !== -1) {
            console.log('libboringssl.dylib loaded');
            var CALLBACK_OFFSET = offset();
            // Imposta un timer per ritardare l'esecuzione del codice
            setTimeout(function() {
                var SSL_CTX_set_info_callback = Module.findExportByName('libboringssl.dylib', 'SSL_CTX_set_info_callback');
                if (SSL_CTX_set_info_callback === null) {
                    console.log('Function SSL_CTX_set_info_callback not found.');
                } else {
                    console.log('Function found at: ' + SSL_CTX_set_info_callback);
                    Interceptor.attach(SSL_CTX_set_info_callback, {
                        onEnter: function(args) {
                            var ssl = new NativePointer(args[0]);
                            var callback = new NativePointer(ssl).add(CALLBACK_OFFSET);
                            callback.writePointer(key_log_callback);
                        }
                    });
                }
            }, 1000); // Attendi 1 secondo prima di controllare di nuovo
        }
    }
});
If your device’s iOS version isn’t included in the script, you can easily find it yourself.
Steps:
- Download an IPSW, unzip it
- Mount the largest DMG image (approximately 5.5GB) and then extract the following folder: /System/Library/Caches/com.apple.dyld.
- Extract the dyld shared cache: dsc_extractor com.apple.dyld/dyld_shared_cache_arm64 extracted.
- Disassemble /usr/lib/libboringssl.dylib in Binary Ninja or similar.
- Locate the ssl_log_secret function. The second instance of ldr instruction holds our offset.
0000000199381680  int64_t bssl::ssl_log_secret(void* arg1, int64_t arg2, char* arg3, int64_t arg4)0000000199381680         sub         sp, sp, #0x60
0000000199381684         stp         x22, x21, [sp, #0x30]
0000000199381688         stp         x20, x19, [sp, #0x40]
000000019938168c         stp         x29, x30, [sp, #0x50]
0000000199381690         add         x29, sp, #0x50
0000000199381694         ldr         x8, [x0, #0x78]
0000000199381698         ldr         x8, [x8, #0x2f8]		; <--- This is our offset
000000019938169c         cbz         x8, 0x1993817a4
The dsc_extractor tool is available here
Demo Temu
In this demo, we will intercept the traffic generated by the Temu application. To follow along, you’ll need to open three terminal windows.
In the first terminal window, we’ll start the Remote Virtual Interface using the Python script I shared earlier.
- python3 rvictl.py start
In the second terminal window, we’ll use tcpdump to capture the traffic.⬤
- tcpdump -i rvi0 -w temu.pcap -P
In the third terminal window, we’ll execute the frida script
- frida -U -l ios-tls-keylogger.js -o keylogfile.txt -f com.einnovation.temu.

The next step is to import the temu.pcap file into Wireshark. While the data will initially appear encrypted, we can decrypt it using the key we captured with Frida.
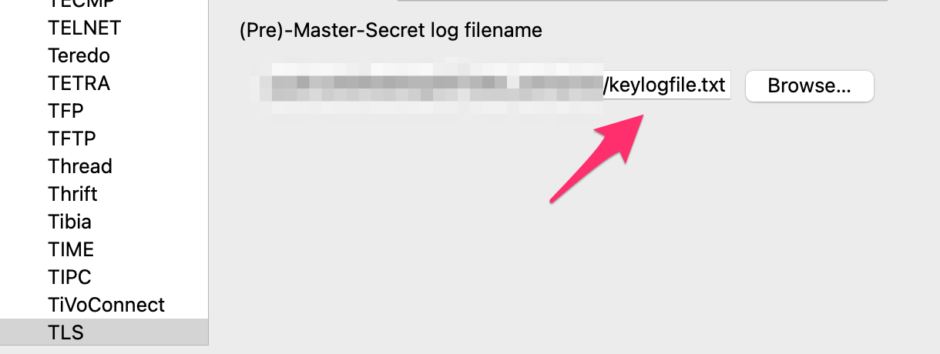
In Wireshark, navigate to Preferences -> Protocols -> TLS. and import the keylogfile

If everything goes smoothly, you’ll see the decrypted traffic.
If you enjoyed the blog, please consider sharing it.⬤